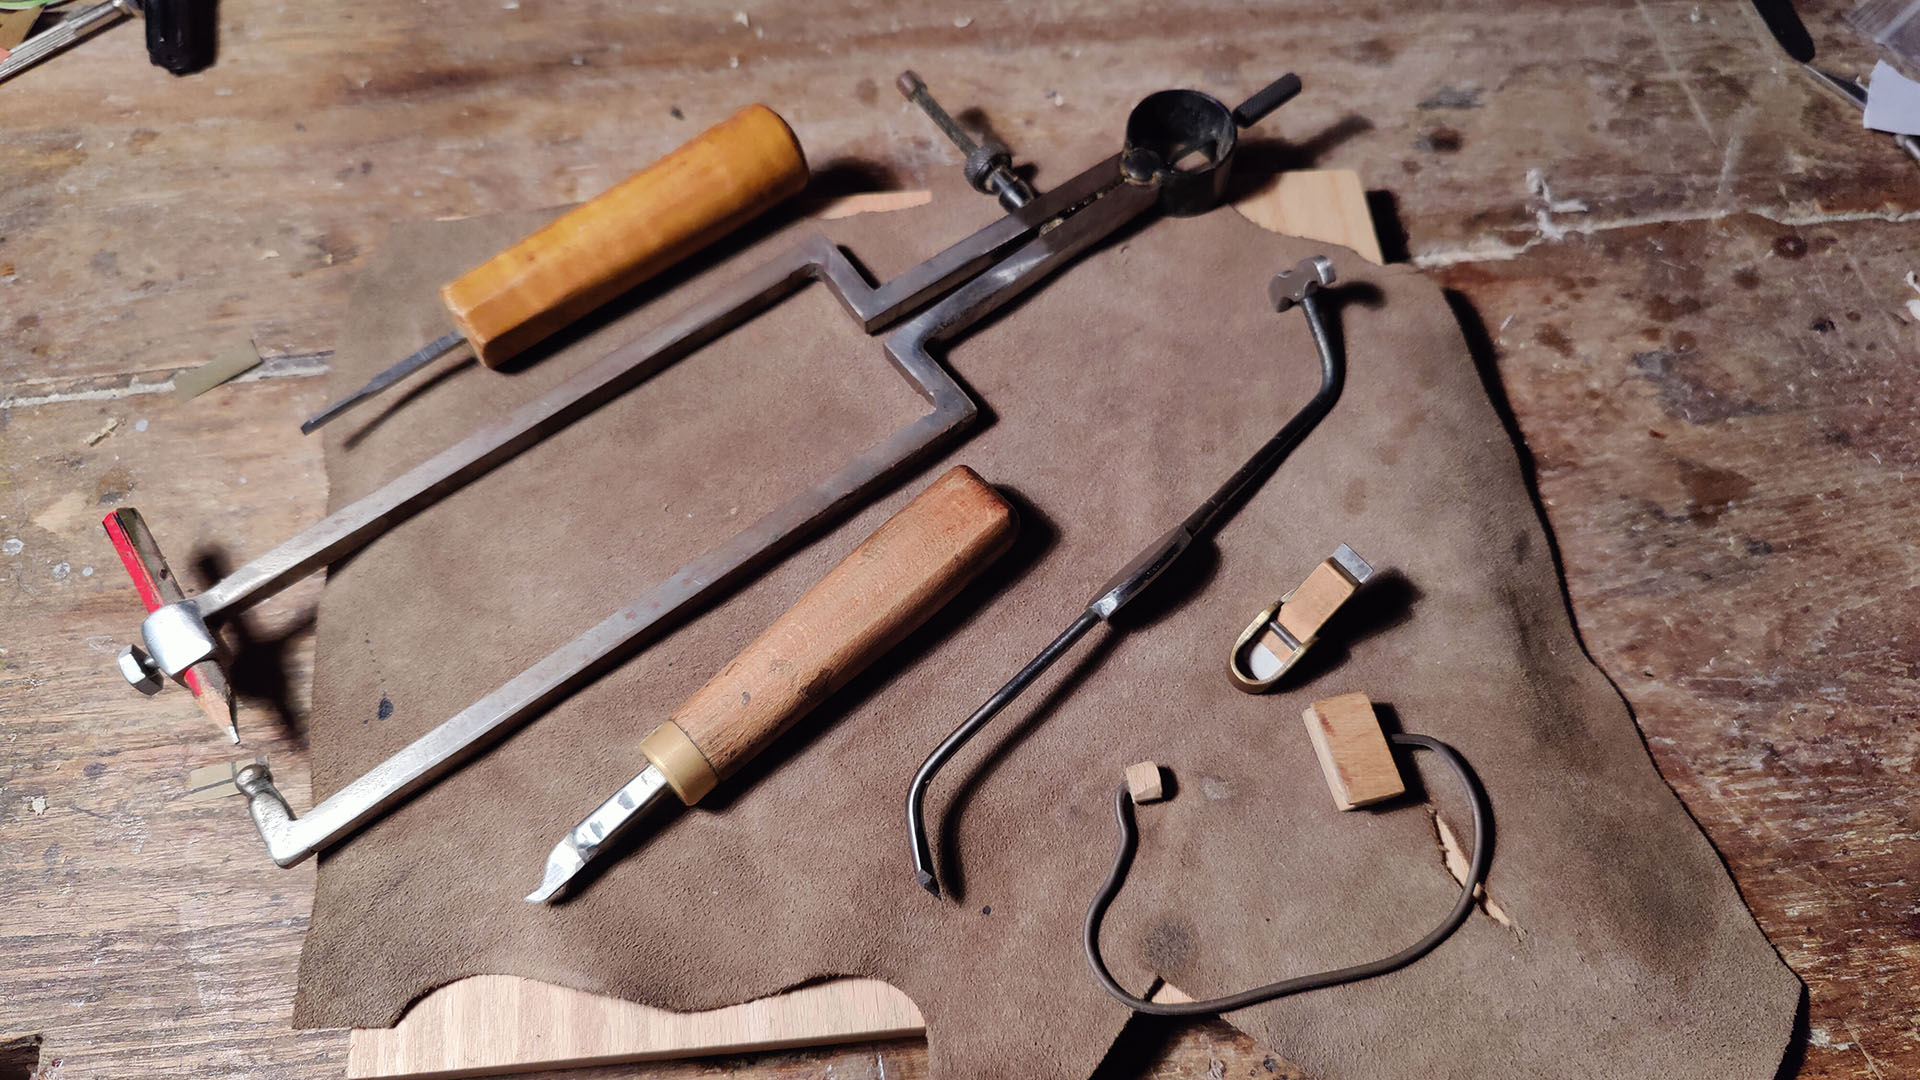
When working with wood, we often rely on steel tools. Some of these usually need to be purchased (for example plane blades and gouges) as they are complex to make. Other types of tools, however, can be produced independently.
Steel (in addition to brass and aluminum) is one of the most used materials. In some cases and for some uses, however, it turns out to be too soft, therefore it needs to be treated (for instance, for the preparation of tools such as knives and chisels). This treatment process is fundamental to give the steel greater hardness.
This article does not claim to be a manual on steel treatment techniques but only wants to be a tutorial on how I perform this type of work in a diy way and, actually, even a little rough; but at the same time effective! I thought it could be useful, since often most of the tools that populate our laboratories are "customized" or even "self-built".
In a luthier's workshop, there is rarely a real blacksmith's forge. A gas torch (even of the type powered by the classic camping canisters), on the other hand, is a tool that we can all have at hand and that does not require specific skills, just a lot of attention: let's remember that we are dealing with fire and compressed gas! This tool can be very useful for many jobs and, for the purpose of preparing our tools, it is certainly sufficient. On the internet, we can also find more performing torches, even powered by a double-tank kit (oxygen + butane) or by cylinders containing a butane/propane mix, which reach higher temperatures. For larger pieces, these solutions can be adopted in combination with a self-build mini furnace made from refractory material (for example, aerated concrete, an extremely economical material with incredible ease of processing). Just, for example, make two holes in a cube of this material (one of sufficient diameter to accommodate the piece to be hardened, the other at the opposite end that will house the mouth of the torch, therefore of the same diameter as the latter), and the job is done (of course the two holes must be connected to each other). These mini-furnaces allow us to retain the heat generated by the flame of the torch, allowing us to better heat the larger pieces: it is just like having a micro-tempering oven available.
Technically we speak of "forging" referring to the act of "manipulation", that is, the work that gives shape to the piece of metal, for example with a hammer, pliers, presses, etc.
We speak instead of "heat treatment" referring to a particular type of "processing" that gives the metal characteristics of hardness and resistance necessary to behave like ...a knife, or a chisel, a gouge, etc..
The steel
Let's start with the material itself: steel. As many know, steel is an alloy composed primarily of iron and carbon (and, sometimes, additional materials like chromium, vanadium, molybdenum, tungsten, and many others: these are called "alloy steels," but we won't cover them in this article).
The percentage of carbon is crucial in determining the consistency of the steel. If the carbon content is too low, the steel is not suitable for making cutting tools, as in most cases it cannot be hardened (unless it undergoes special treatments like carburizing, which requires the use of specific furnaces).
The "number" of carbon "C" defines the type of steel we have. Just to be clear, C10 means that the steel has a carbon percentage of about 0.10%, while C40 indicates a carbon percentage of about 0.40%. If we consider common "building rebars", we're talking about a steel with a very low carbon percentage. The lower the carbon percentage, the less suitable the material is for creating cutting tools.
One of the most common steels is C40. This can be safely used for our purposes. Obviously, if you want to achieve higher performance and hardness, you can go for steels with a higher carbon content (such as C70, for example).
Forging
Once you've chosen the right steel, it's time to shape it. This process, called forging, requires heating the steel until it becomes malleable.
For forging, the heat from a torch is generally sufficient. The steel becomes malleable when it reaches a cherry red/orange color. It's important to work the metal above this temperature, alternating between heating and working. Remember: the smaller the piece, the faster it cools.
Quenching
Once the desired shape is achieved, the object is heated again to a bright cherry/red temperature (approximately 800 degrees Celsius) and then cooled rapidly. I use a container filled with room temperature water, covered with a layer of vegetal oil, and this operation is crucial for the quenching process. It is important to be quick in the transition from the torch to the water/oil mixture.
There is a small test that is done to determine if the steel has reached the ideal conditions (and considerable properly quenched): a magnet is brought close to the object and it is observed whether there is attraction between the two. Steel, when heated beyond the "Curie temperature" (about 780 degrees Celsius), loses its ferromagnetic characteristics, so it does not react when brought close to a magnet. Usually, after successfully performing this test, it is good to give a safety margin by heating the material a little more, and then proceed with the quenching bath.
Following this operation, we find ourselves with a blackened metal, but, above all, extremely hard.
Before proceeding with tempering, it is necessary to remove this dark surface layer. For this purpose, a simple fine sandpaper is enough. Later in the article, I will explain why this operation is necessary...
Well... are only halfway there. Quenching itself gives hardness to the material but, at the same time, it makes it very brittle. In essence, our tool is not yet usable: it is necessary to perform what is technically called "tempering".
Tempering
We all have a nice water-cooled grinding wheel in our workshops: it's an essential tool, excellent for finishing the cutting edge before moving on to stones and leather. But when it is necessary to remove a substantial amount of material, we would have to spend days and days attached to that contraption, with the obvious problems that can be imagined. It is much better to carry out the roughing with the good old traditional grinding wheel. However, you have to be very careful: it is very easy for our blade to "burn". Has it ever happened to you to rough out a knife or a chisel on the grinding wheel and, at the best moment, after having approached the final shape of the cutting edge... you find yourself lingering a little too long on the grinding wheel (forgetting to wet your beloved knife in the basin of water that you had so diligently used until a few minutes before...)? Just an instant and your beautiful blade turns dark brown or, even worse, purple... it's the end; and it is the moment in which you use your full repertoire of curses. Cutting edge ruined, steel softened; in short... work to be redone.
Well, what just happened to you is that you have "tempered" the blade.
It is good to reiterate that grinding is a very delicate operation because it is important not to overheat the piece excessively. To do this, it is essential to always keep the material wet, something that is known to anyone who works metal.
In this context, tempering is, for obvious reasons, a bad thing (very bad); but if we exploit this "tempering" technique in a controlled way, we can actually make our beautiful piece of steel, previously hardened, finally usable, making it less fragile and more resistant.
The secret is to reach the right temperature WITHOUT EVER EXCEEDING IT.
At an industrial level, temperature-controlled furnaces are used. Those can bring the entire piece of steel to a temperature between 230 and 240 degrees (approximately), for a specific period of time so that the treatment affects the entire mass of the object uniformly. With this method, the tempering affects not only a portion of the blade, but the entire piece as a whole.
To achieve a similar result, many use their home oven which, in fact, is able to reach those temperatures. But it is equally true that this operation could result in a useless waste of energy: at least in those cases where we only need small portions of our tool to be heat treated.
For example, in a chisel or in a knife, the part we want to be hardened/tempered is the tip.
If we take, for example, a soundpost iron, it could be useful to temper the part that "pierces" the soundpost (a part that is usually sharpened: it often happens that in the irons we find on the market this part is not hardened at all, It is indeed rather soft).
Therefore, in all cases where we are only interested in a small portion of the tool to be subjected to the treatment, we can proceed in a much faster way using the torch. (on knives it could be a little more difficult as they have an oblique blade).
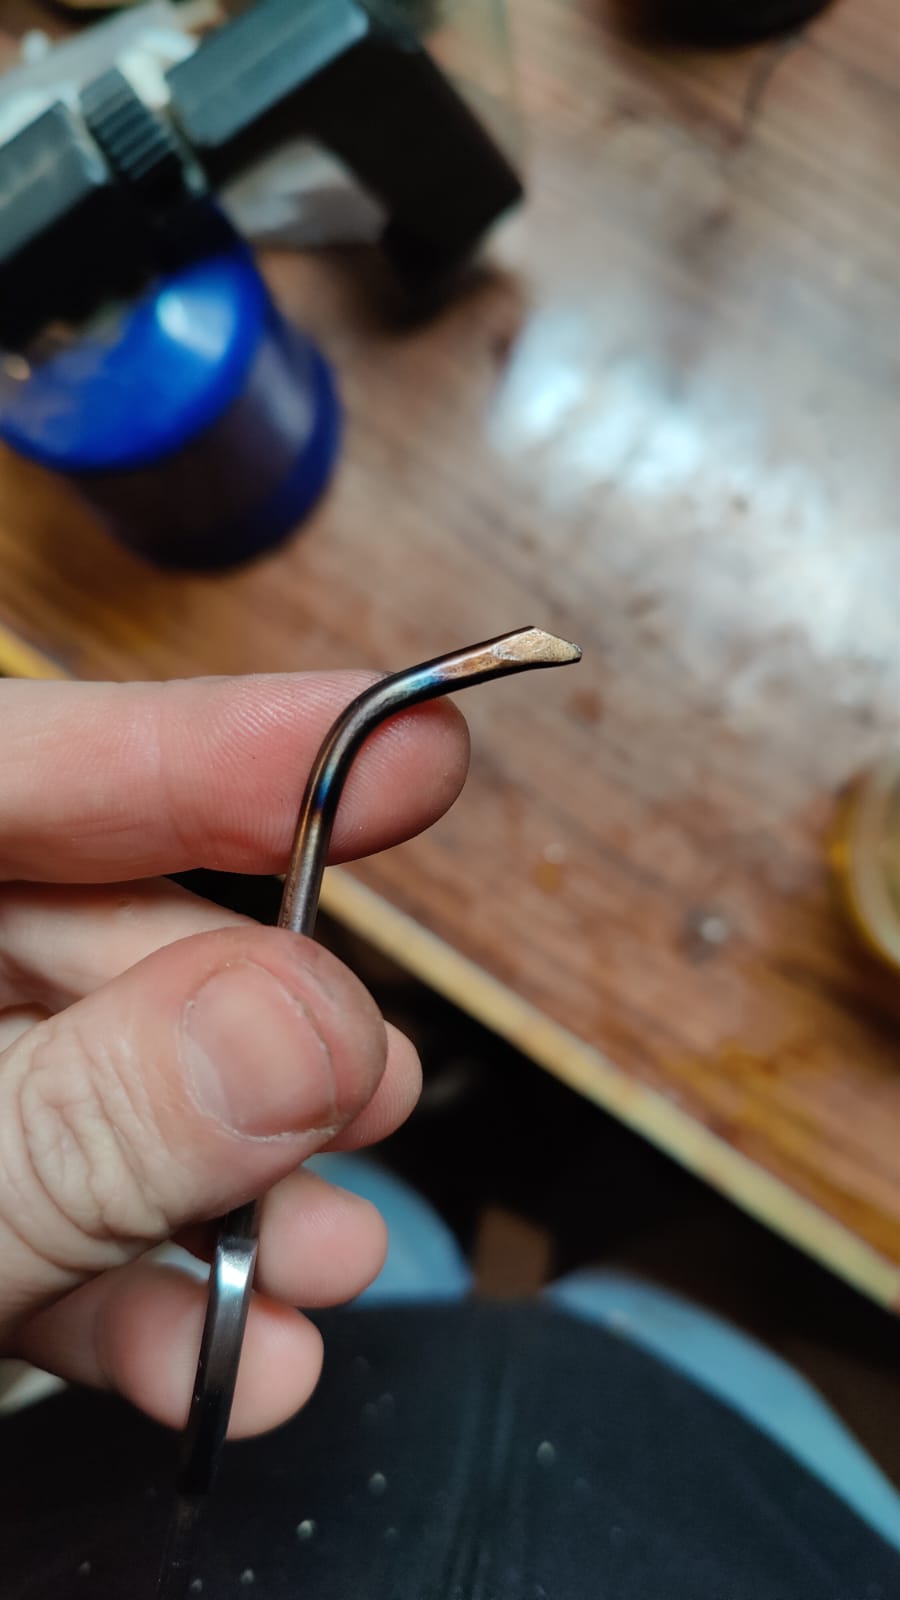
Let's briefly return to our knife previously "burned" on the grinding wheel: after the curses and swearwords (and after calming down), we can observe it carefully, discovering that its surface shows colored areas. These constitute precious "indicators" that tell us what maximum temperature the metal has reached in that specific area. Usually (in increasing order of temperature) we start from a light yellow and then turn towards a golden yellow; follow: burnished gold, brown, purple, dark blue, grey...

As we heat a piece of steel, we observe a dynamic evolution of colors as the temperature increases. Since we need to temper the desired area without exceeding 240 degrees Celsius, it's easy to understand how to interpret these colors to know when our heated tool is within that temperature range: we're looking for a GOLDEN YELLOW COLOR.
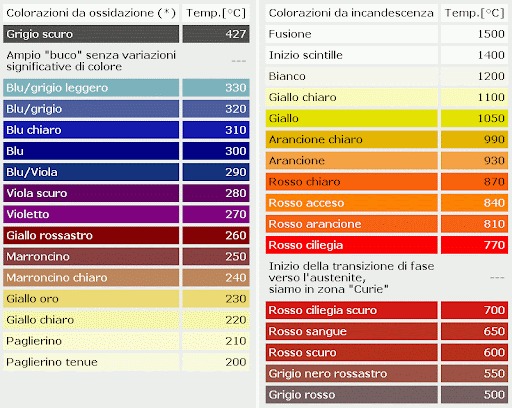
Since we're using a torch to reach this temperature, it's easy to lose control (especially on very small and thin pieces as they heat up very quickly) and exceed the temperature beyond which another phenomenon occurs: the loss of temper. If, by mistake, our edge reaches a brown color, or worse, purple or blue, the piece is considered "burnt" (softened): the steel has returned to its original characteristics (pre-quenching).
It's important to consider that this isn't the end of the world: you just need to repeat the quenching process described above and, consequently, repeat the tempering, being more careful this time.
But then, how can we prevent the situation from deteriorating rapidly?
First of all, during the tempering phase (for example, of a chisel) with a torch, I won't heat the tip (the cutting edge, which is supposed to be the tempered part), otherwise the risk of going beyond the temperature limit is very high, in fact, it's not a risk but a certainty. In reality, we should heat an area that is at a "safe distance" from the cutting edge: it's right there that we will see the colors appear. As the temperature increases, we will see these colors gradually move away from the area we are holding under the flame. At that point we must be ready: when the cutting edge has reached the famous golden color (therefore a temperature of about 230/240 degrees), we must be ready to cool the piece to avoid exceeding the limit (remember that if it reaches brown, it's too late). So, the basin containing water and oil can be useful to stop the temperature escalation at the exact moment when the cutting edge has assumed the correct color.
We must be very careful and quick: especially on thin pieces, things happen very quickly and the risk of "burning" is high. For this purpose, it is advisable to use a "soft" flame to slow down the propagation of heat.
You might wonder why I said to sand the surface of the steel after quenching. The reason is that a darkened surface does not allow the visualization of colors, making it impossible to have a visual reference of the color evolution of the piece during the tempering phase.
I would like to reiterate that this small guide does not claim to state scientific data but simply wants to tell you about my experience and my techniques. Industrially or by differently equipped structures, different procedures are followed, which are a bit more "scientific". These are the techniques of a luthier who, being a craftsman, loves to build all his own tools.